


Removing old attic insulation can seem like a daunting task, but it’s entirely manageable with the right plan. Whether your insulation is damaged, contaminated, or just too old to work well, taking it out yourself can save you hundreds of dollars. Removing attic insulation safely requires the right gear, good planning, and patience. This guide will walk you through every step to make your attic clean and ready for fresh insulation.
Old insulation often loses its power over time. Water damage, pest problems, or simple age can make it less effective at keeping your home comfortable. When you remove it yourself, you control the process and ensure every bit gets cleaned out properly.
Why Remove Old Attic Insulation?
Several signs tell you it’s time for attic insulation removal. Water-damaged insulation can grow mold and create health risks. Rodents love to nest in old insulation, leaving behind droppings and contamination. Fire-damaged insulation keeps that smoky smell until you remove it completely.
Old insulation also settles and compresses over time. This means it doesn’t trap air as well, making your heating and cooling systems work harder. According to industry experts at Brady Pest Control, removing contaminated insulation improves air quality and prepares your space for better materials.
Some older homes have insulation with dangerous materials like asbestos. If your home was built before 1980, get the insulation tested before you start removing it yourself. Safety always comes first.
Gear Up with PPE: Your Safety Equipment
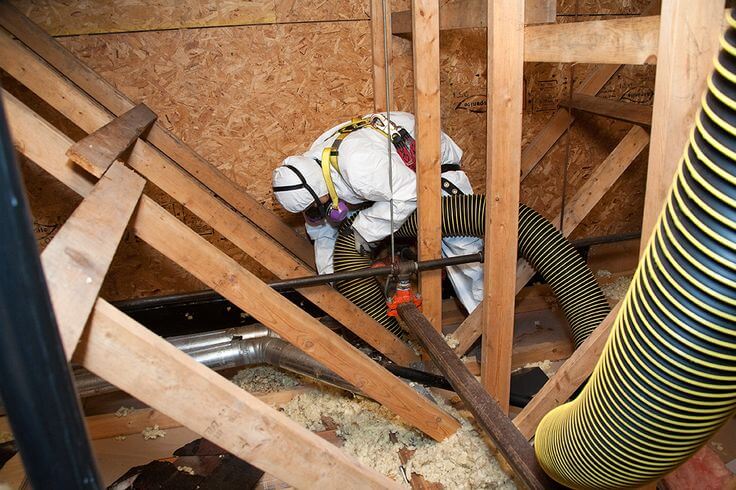
Before you climb into that attic, you need the right protective gear. DIY attic insulation removal creates lots of dust and particles that can hurt your lungs and skin.
Essential Safety Gear
Mask or Respirator: This is the most important piece of equipment. A simple dust mask won’t cut it. Get an N95 respirator or better to keep insulation fibers out of your lungs.
Safety Glasses: Falling debris and floating particles can damage your eyes. Tight-fitting safety glasses or goggles work best.
Heavy-Duty Gloves: Fiberglass insulation makes your hands itch like crazy. Thick work gloves protect your skin and give you better grip on tools.
Full-Body Coveralls: Long sleeves and pants aren’t enough. Get disposable coveralls with a hood to cover your whole body. This prevents insulation from sticking to your clothes and skin.
Don’t skip any of these items. RetroFoam of Michigan experts report that proper protective equipment makes the job much safer and more comfortable.
Prepare Your Work Site
Good preparation makes removing attic insulation yourself much easier and cleaner.
Protect Your Living Space
Lay plastic sheeting or drop cloths in the rooms below your attic. Insulation dust finds its way everywhere, so cover furniture and belongings you can’t move.
Tape plastic around the attic access point to create a barrier. This keeps dust from floating down into your house.
Set Up Ventilation
Open windows in the attic area if possible. Set up fans to move air around, but wait until you’ve sealed off the work area. You want airflow in the attic without blowing dust into your living space.
Stage Your Equipment
Get all your tools into the attic before you start working. You’ll need:
- Vacuum with long hose (for blown-in insulation)
- Heavy-duty garbage bags
- Hand tools for batt insulation
- Flashlight or headlamp
- Small rake or garden tools
Having everything ready saves you trips up and down the ladder. Follow Us on Facebook, Pinterest and Twitter for the latest updates.
How to Remove Blown-In Insulation
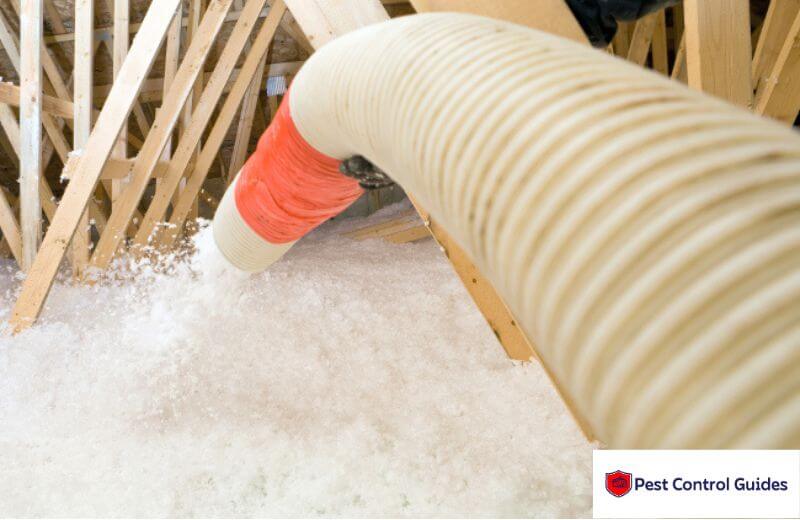
Blown-in insulation removal takes more effort than removing batts, but the right approach makes it manageable.
Vacuum Method (Recommended)
Rent a powerful insulation removal vacuum from an equipment store. These machines have much more suction than regular shop vacuums. Some contractors use 1,500-horsepower units for commercial jobs.
Connect the long hose and route it carefully into the attic. Make sure all connections fit tightly to prevent clogs and maintain suction.
Start at the farthest corner from your access point and work backward. This prevents you from walking through areas you’ve already cleaned.
Have a helper below to manage the collection bags and clear any clogs in the hose. Communication is key – work out hand signals since the vacuum is loud.
Manual Method
If you can’t rent a vacuum, you can remove blown-in insulation by hand. Use a small rake to gather the material into piles. Scoop it into heavy-duty garbage bags using a dustpan or small shovel.
This method takes much longer and creates more dust. Work in small sections and take breaks to avoid getting overwhelmed. Subscribe to Pest Control Guides for the Latest Pest Guides
How to Remove Batt Insulation
Batt insulation removal is more straightforward than dealing with blown-in material.
Roll and Bag Method
Start at one end of each batt and roll it up carefully. The material compresses as you roll, making it easier to handle.
Place rolled batts directly into large garbage bags. Don’t overfill the bags – they get heavy quickly and might tear.
Tie each bag securely before moving it. Squeeze out extra air to make the bags smaller and easier to handle.
Work Systematically
Remove batts in a logical order so you don’t have to crawl over the same areas repeatedly. Work from the outside edges toward your access point.
Check for any remaining pieces stuck between joists. These small bits add up and can affect your new insulation’s performance.
Safe Disposal Methods
Proper disposal is part of how to remove attic insulation safely. You can’t just put insulation bags out for regular trash pickup.
Bag and Seal Properly
Use heavy-duty contractor bags rated for construction debris. Regular garbage bags tear too easily with insulation.
Squeeze air out of filled bags before tying them shut. This prevents messes and makes bags easier to move.
Double-bag if you’re worried about tears. It’s better to use extra bags than clean up spilled insulation.
Contact Local Disposal Centers
Call your local landfill or waste management company before starting the job. Each area has different rules for accepting insulation materials.
Some centers charge by weight, others by volume. Get pricing information so you can budget for disposal costs.
Managing Common Challenges
Every DIY insulation removal project has its obstacles. Here’s how to handle the most common problems.
Dealing with Dust
Even with good ventilation, dust gets everywhere. Change your mask regularly when it gets clogged. Keep extra masks handy.
Work in shorter sessions to avoid breathing problems. Take breaks outside the attic to get fresh air.
Preventing Vacuum Clogs
Keep the vacuum hose moving to prevent material from packing inside. If the suction drops, stop and clear the blockage right away.
Check connections regularly. Loose fittings reduce suction and let dust escape.
Tight Spaces and Low Ceilings
Some attics have very little headroom. Use knee pads to protect yourself when crawling. A small piece of plywood makes a good platform to kneel or sit on.
Take your time in tight areas. Rushing leads to injuries and incomplete removal.
When to Call Professionals
While removing old attic insulation yourself saves money, some situations need professional help.
Hazardous Materials
If your insulation contains asbestos, hire certified removal specialists. Testing costs $250-850, but it’s worth it for your safety.
Mold contamination also requires professional treatment. Don’t risk your health trying to handle dangerous materials yourself.
Extensive Pest Damage
Heavy rodent infestation creates health hazards beyond simple insulation removal. Professionals have the equipment and training to safely clean contaminated areas.
According to Brady Pest Control specialists, pest-damaged insulation often requires sanitization services that go beyond basic removal.
Cost Considerations
Attic insulation removal cost varies based on your attic size and the removal method you choose.
DIY Costs
Renting a vacuum costs $200-350 per day. Add disposal fees of $200-500 depending on the amount of material and local rates.
Protective equipment costs $50-100 for quality gear. Heavy-duty bags add another $30-50.
Total DIY costs typically range from $300-600 for an average-sized attic.
Professional vs. DIY
Professional removal costs $1-2 per square foot. For a 1,500 square foot attic, expect to pay $1,500-3,000.
Doing it yourself can save $1,000-2,500, making it worthwhile for most homeowners.
Professional Services and Next Steps
While DIY removal saves money, professional services offer expertise and specialized equipment. Companies like Brady Pest Control provide comprehensive attic insulation removal and replacement services that handle everything from removal to cleanup.
If you discover pest contamination or suspect hazardous materials during your project, stop work and consult professionals immediately. Your safety is worth more than the money you might save.
Ready to tackle your attic insulation project? Share this guide with anyone planning similar work – they’ll thank you for the detailed steps and safety tips. For complex situations or if you prefer professional help, consider getting quotes from certified insulation contractors in your area.
Conclusion
Our 2025 guide gives you all the steps needed for safe, effective DIY attic insulation removal. From gearing up with proper PPE to disposing of materials correctly, following these steps ensures your project succeeds.
Remember that removing attic insulation safely protects both your health and your home. Take breaks, work systematically, and don’t rush the process. With good planning and careful execution, you’ll have a clean attic ready for fresh, efficient insulation. Read Our Most Recently Published Guides on Termites, Earwigs, Fruit Flies, Ants Control, Baby Termites, Carpenter Ants and Gnats:
Frequently Asked Questions
What is the easiest way to remove insulation?
Use a vacuum for blown-in insulation and bag rolls by hand for batt insulation.
What is the best way to get insulation off of you?
Shower with cool water first to wash fibers away, then change clothes.
Can you remove loft insulation yourself?
Yes, if it is not asbestos. Always wear PPE.
What removes insulation?
Vacuum machines, shop vacs, or manual bagging.
Is it worth removing old insulation from an attic?
Yes, if it is dirty, moldy, or no longer effective.
Can I remove foam insulation myself?
No, spray foam is hard to remove. Hire a pro.
How long does fiberglass stay in your lungs?
Fibers may stay for months. Always wear a respirator.
Can I use a shop vac to remove attic insulation?
Yes, for small spaces, but it may clog easily.
Should you remove attic insulation?
Yes, if it is wet, moldy, pest-infested, or very old.
How to tell if insulation is asbestos?
It looks gray, fluffy, and grainy. Send a sample to a lab before touching.
Should I remove old attic insulation before I spray foam?
Yes, remove it first for best results.
